Friday, August 20, 2021
CATALOGS - CAPTURE ONE - GET ORGANIZED!
Submitted by Bill Booth How many times have you asked yourself "Where is that image? I know it is on some drive or other, but exactly where?" Since the advent of digital photography, a huge issue has been the DAM - Digital Asset Management. Programs have come and gone. DAM systems have consumed hours of setup. Computer operating systems have changed, and files have grown larger by several magnitudes. My Nikon D3 files are 12 MPX, while my new Nikon D7II produces 45 MPX files.
Capture One Catalogs are one solution to DAM, and I will walk you through the basics of getting on board. I am not affiliated with C1, just a satisfied user. As usual with my posts, feel free to contact me with any questions.
You and your camera have captured a card full of images, and now you want to process them. Capture One (C1) beautifully handles RAW images from Nikon, Canon, Fujifilm, Sony, and of course, Phase One Medium format cameras for which it was originally developed. Having been an Apple Aperture user for many years, I find that C1 produces better results with my Nikon RAW files, and although I miss the DAM features of Aperture, I have embraced the C1 way of organizing my photos, and it does the job very well. The editing features of C1 would take another posting itself, so I will concentrate on just the DAM setup that I use.
Import
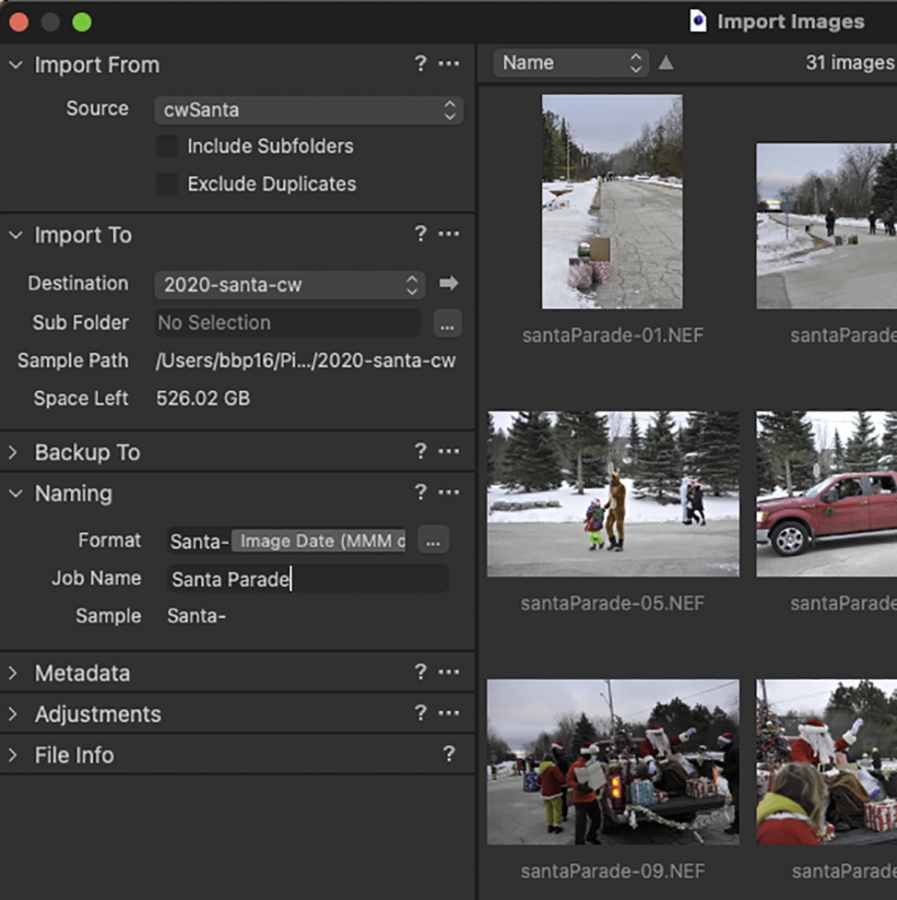
The first step is to Import your RAW images into a Catalog in C1. The Import screen has several options that need to be addressed, including:
- Import From - Select your camera card, or if you prefer, the Folder on your PC where you may have copied your files initially from your card.
- Import To - Mac users can use the *Pictures* folder and create a new folder such as 2021 Catalog. Within this Catalog, the images can be further imported to sub-folders.
- Backup To - You can set a location to backup your RAW files, perhaps an external disc.
- Naming - There are many options, or you can just let C1 use the camera's file system (_DD341234.NEF). You can get quite creative by using C1's Tokens in your naming regime. For example, you could Format the file names with any of the dozens of Metadata tokens that the camera supplies like Focal Length, Lens, Date, Shutter Speed, Aperture, City, Event, etc.
The file import is quick, and images are available right away as others are still loading. The more fine tuning you do at the import stage, the less organizing you need to do later. C1 offers batch renaming, so you are never at a loss, before or after imports. You are now ready to edit your images. Capture One has tons of very detailed tutorials and webinars to lead you through the paces. It's a very powerful program.
Now to the organization of your images.
After days or weeks, you will repeat the Import several times, with different subjects, locations, models etc. They can all go into one Catalog. So how can you keep things in order and findable? C1 lists your folders, mirroring the Finder layout.
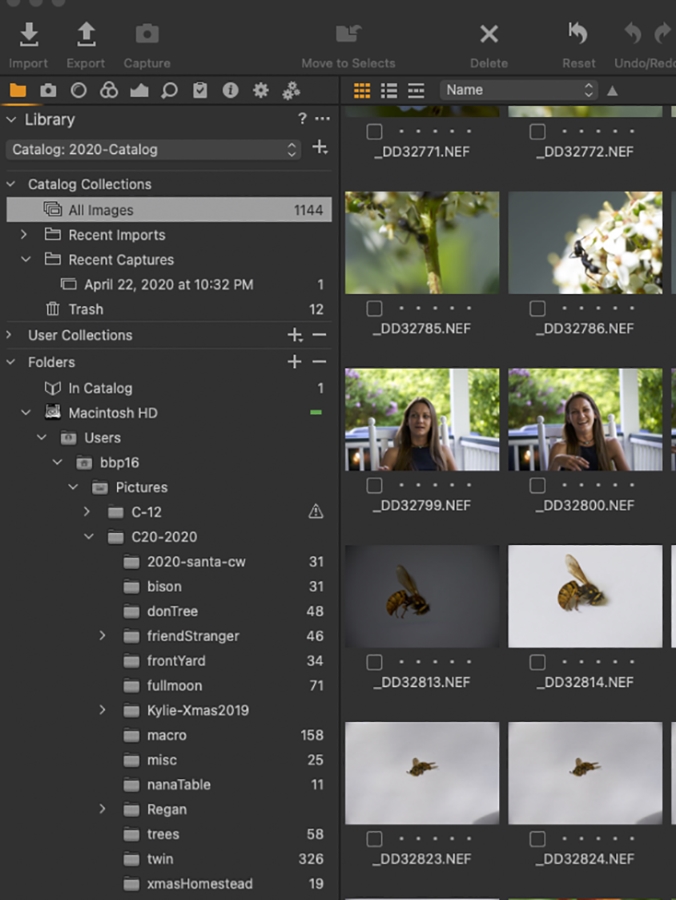
The number of files in each folder is listed. Keep in mind that no copies have been, nor will be created. The RAW images remain in their folders and C1 is referencing them. In fact, C1 never messes with the original RAW file, but rather stores any adjustments such as white balance, colour grading, cropping, vignetting, and so on, in a database. C1 uses SQLite database, which is one of the fastest and most widely distributed database managers available. You never have to worry about the DB - it works totally behind the scenes. The process is "non-destructive" so you can go back and readjust anything you want.
Filters
By using one Catalog, you will end up with potentially a very large number of files. C1 can easily handle tens of thousands of images. Put the Catalog itself, i.e. the database, on your fastest hard drive, presumably the drive inside your computer. The RAW image files can live elsewhere, perhaps an external hard drive.
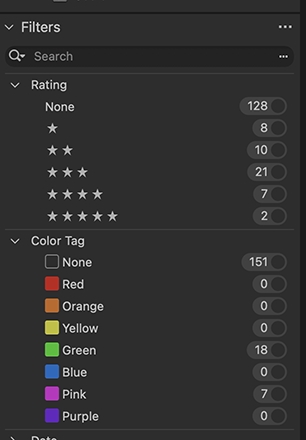
On the first pass through the Catalog, you will want to rate your images. Everyone seems to have a different system for 1 to 5 stars and colour tags. It’s up to you. Selections will be based on your criteria. What if you want to see only your 5 Star rated images with a Blue tag? In the screen shot, there are 18 images rated Green, 7 Pink, 8 One Star, 2 five Star, and so on. Assuming you rated some of your best shots, just put these filters in the search box, and voilà, they are sorted for you. Searches are not limited to ratings. Your search can be based on as many as 75 Criteria, from Basic data to International Press Telecommunications Council (ITPC), and Exchangeable Image File Format (EXIF) metadata.
If you edit a Pink Colour Rated image, and change it to Green, the numbers on the sidebar will change instantly. Again, no additional files are created, just the database entries.
C1 allows you to customize many tasks that are repetitive. If you always start with One Star Green files, make a Preset for that filtered Search.
User Collections

The next step in really getting a handle on your catalog is the C1 User Collection scheme. A User Collection is yet another table in the database, and again, does not make copies of the images in the collection. We often come home with a bunch of images that may not be connected. For example, some scenic images can be mixed in with photos of the dog, then a closeup of some lovely flowers. They all ended up in one folder! Rather than rearranging the folder contents, we can make several albums in the User Collections: Scenics; Animals; Flowers; then drag/drop the images into their particular album, and while we are at it, drop images from other folders as well. Still no disc bloat because only the database knows about these arrangements and the original files stay put. Albums can also be Smart. So if I make a Smart Album "Needs Work" for images that need more work, I can automatically populate it with One Star and Green Tag files. These Smart Albums keep current in that if you change the rating to 2 stars, the image will be removed from the "Needs Work" album.
This system is very powerful and arguably more convenient and easier than using Keywords, although C1 offers Key-wording as well. I personally find that there are too many choices when it comes to using keywords. In any case, the response time is very fast when making selections, so it is a pleasure to use. Just an aside: see the spelling of *keywords* in this paragraph! Singular, hyphenated, capitalized ... these variances tend to confuse the keyword search, and make consistency a challenge.
Process Recipes
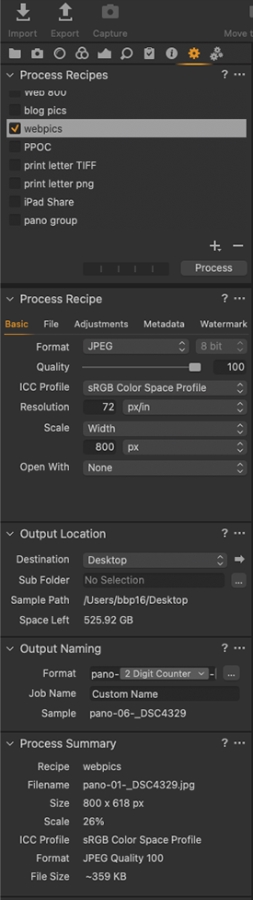
So far, you have taken the photos, made adjustments, sorted them all into findable places. Now you need to make them available for clients, web galleries, salon submissions, and prints. C1 can create Recipes to suit.
Let's say you want to put a selected group of images in a gallery for the web. Set up the Recipe to your liking, then select your images, and enable the Process. You can make a Recipe for Salon, or Accreditation submissions. Combining Recipes to make a folder for web images, another for print, and another to copy to your smart phone, are available, all with one push of the Process button!
If you want to produce different versions of your images, for example Black and White, you could create a New Variant for the original file, and convert it to B&W. Once more, you are not copying the RAW file, but simply telling the Database to make a different set of adjustments to the file, all non-destructively.
My catalog has several thousand images. The Catalog itself is about 3 GB and the RAW files that are referenced are about 60 GB. When it comes time to move the RAW files off of my working laptop to free up space, it is best to do it from within Capture One. This way, C1 will keep track of where the RAW files went. While keeping the Catalog file, i.e. the database on my laptop, I can still see the images and make some adjustments even if my offloaded files are not connected. When I reconnect the external storage device, C1 will catch up with any changes and update the preview files used for editing. Catalogs can be imported or combined with other Catalogs to make a larger Catalog. This facilitates keeping a larger stash of images on hand. Many C1 users have 50,000 images in their catalogs. Alternately, you can open more than one catalog in a new window. Computer resources, memory and disc speed will dictate how much is reasonable.
For those who are using Lightroom, you will notice many similarities, so the concepts are not really new to you. To move from one system to another is no small task, but C1 does provide pretty good import facilities, although some Lightroom adjustments will not come across. If you are considering Capture One, they offer a one month trial. You must be willing to shake it out thoroughly, so do not leave it until the day before the trial expires. I suggest using fairly small collections of RAW images just to test out how things work. As always, use files that are throwaway, non-production.
I hope you found this post informative and interesting. This is by no means a definitive tutorial. It is intended to give you ideas and insight into the Capture One DAM process. You might find that a quick phone call to me can answer some of your questions better than long emails or contacting official support. Additionally, C1 has a vast library of Tutorials and Webinars to view, covering all aspects of the program. I am available to give you a hand. Questions are more than welcome. Enjoy.
Submission by Bill Booth Bill has been an Accredited member of the PPOC since 2008. He has an accreditation in Botanical. He describes himself as a Generalist Photographer and Computer/Technology enthusiast. Bill was the Ontario Salon Chair for 2017-18. You can see his photography on the website at: billboothphoto.com. He maintains his own blog listed as: billbooth.com.