Wednesday, August 26, 2020
FINDING NEOWISE - PRACTICAL TIPS ON ASTRO PHOTOGRAPHY
(Story by Sean McKinnon). In late July, as a welcome distraction from all things COVID-19, the world’s attention was briefly diverted to Comet C/2020 F3, better known as Comet NEOWISE. NEOWISE is named after the Near-Earth Object Wide-field Infrared Survey Explorer space telescope that discovered the comet on March 27, 2020.
The comet reached perihelion (closest approach to the Sun) on July 3rd and was at its closest to the Earth on July 23rd. Its pass by the sun increased the outgassing that creates the comet’s tail, and also increased the magnitude of its brightness such that it became visible to the naked eye in much of North America, and the brightest comet since Comet Hale-Bopp in 1997. The comet’s orbit won’t bring it back for about 6700 years, so many photographers were inspired to try to capture images of it before it disappears, myself included.
I am not an astrophotographer by any stretch of the imagination. My previous attempts include a few shots of full moons and a lunar eclipse, and one attempt at a Milky Way galaxy shot last summer. This blog is not a lesson in astrophotography, and it isn’t even really about my photos of NEOWISE, but more about following through on an idea, and the research I did and the tools I used in order to get the (mediocre) shots that I did get.
Once I had decided I was going to try to do this, I started thinking about where I might be able to shoot from. I live in Newmarket, ON, about 30 minutes north of Toronto, so avoiding light pollution and finding a dark sky site would be important, but I also didn’t want to drive too far away from home and make it a really long night.
There are several websites that show light pollution, and one of the first ones I found was Blue Marble (https://blue-marble.de/nightlights/2017) which showed an interesting dark area about 30 minutes from my home just north and east of Mount Albert:
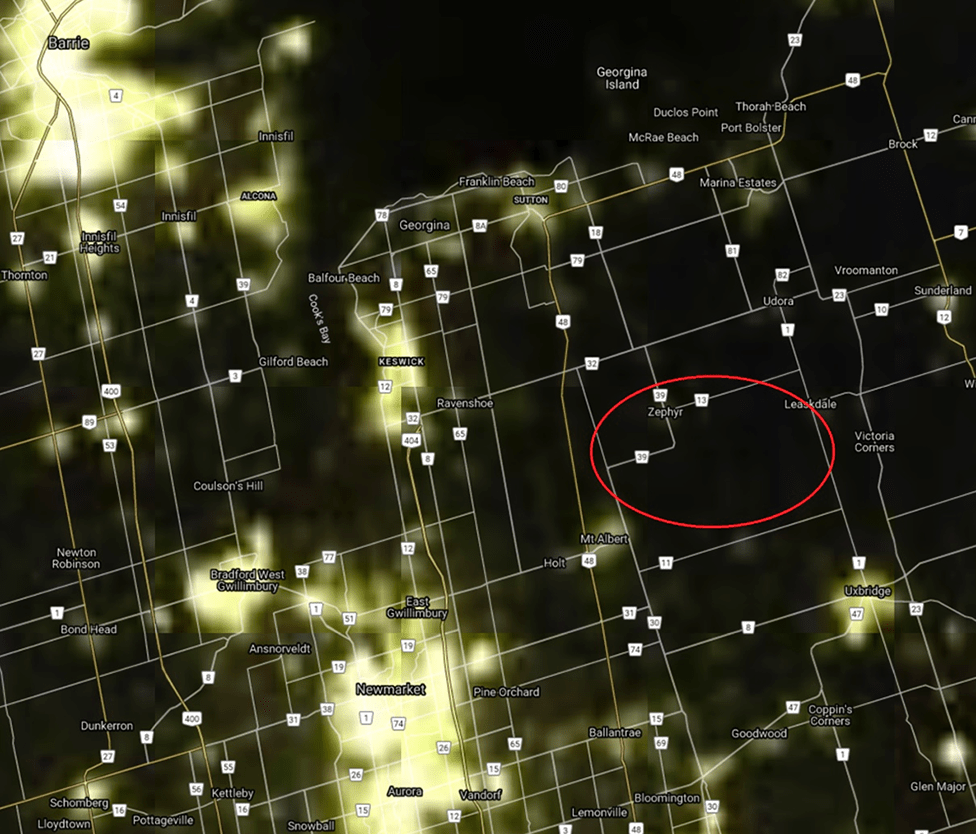
Another site, Light Pollution Map (https://www.lightpollutionmap.info/) was a little more detailed, and showed the general area I had located was going to be significantly better than Newmarket, but not as good as if I had been willing to travel farther east and north:

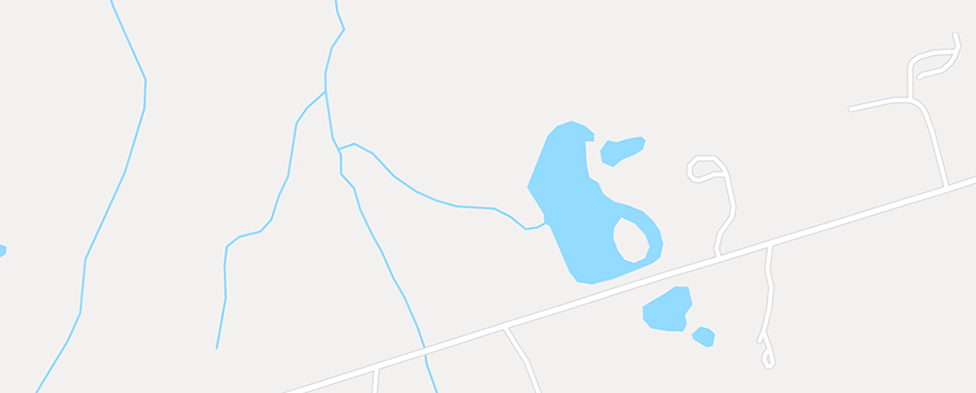
Once I had a general area picked out, I started using Google Maps to try to locate a body of water that I might be able to use as foreground interest. The body of water would need to be accessible at night via car (close to the road) and on the north side of the road so that I could shoot across it at the night sky.
I found a promising candidate location that looked like this (street names removed):
I then used Google Street View to try to get an idea of what the sightlines would be from the roadside across the body of water and saw this:
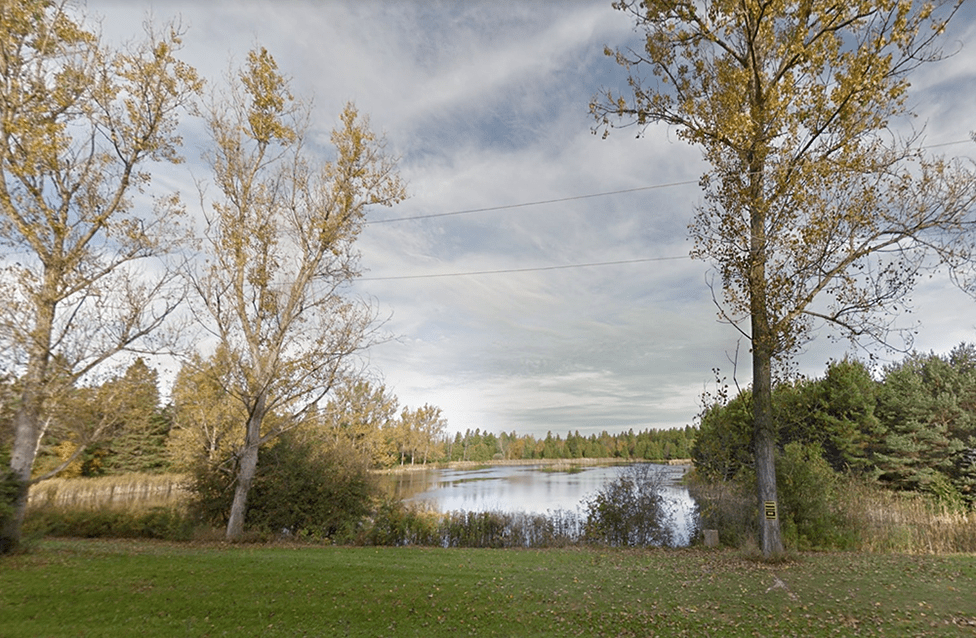
The pond is on private property, but there appeared to be a road shoulder to park on and a boulevard from which I could shoot without trespassing, and the sightlines looked like it would work.
Having chosen a location, my next task would be to find a good night to shoot. NEOWISE was going to be visible just below Ursa Major (the Big Dipper) about 1-2 hours after sunset as it approached the Earth between July 16th and 23rd.
The comet would likely begin to dim as it moved farther from the Sun, even as it moved closer to the Earth, so getting out to shoot as soon as possible was preferable, and in order to be able to see the comet, I was going to need a night with clear skies, and also, ideally, a night with little moonlight.
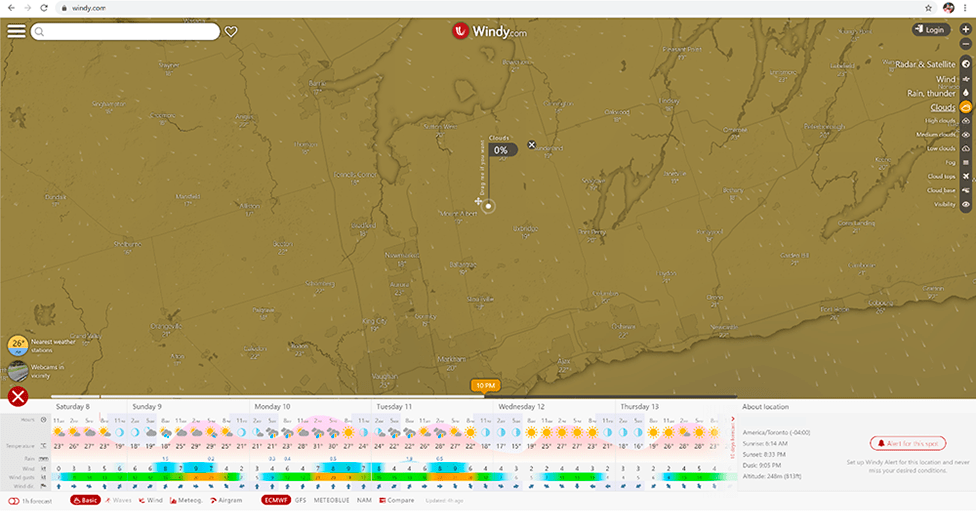
Fortunately, there is a website called Windy (https://www.windy.com/) that provides detailed weather forecasting maps with many types of overlays (including cloud cover, rain, wind, temperature, and many others).
It also has a date/time slider at the bottom that lets you “look into the future” and get a prediction of the conditions at your chosen location. By scanning ahead at my chosen location, I found that the evening of July 20th was predicted to have 0% cloud cover.
I didn’t grab a screenshot at the time, but the image below shows that my chosen location would have 0% cloud cover on August 11th at 10pm (which is the same as how it looked on July 20th when I went out):
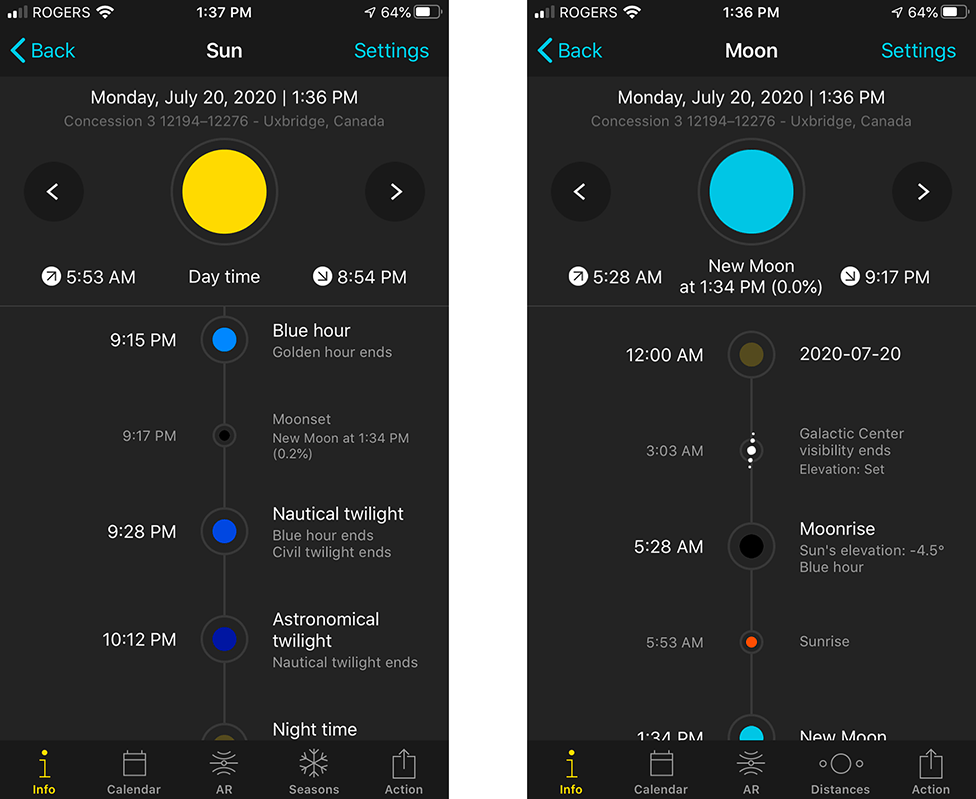
With my date and location chosen, I began to plan for the shoot. The Photo Pills app (https://www.photopills.com/) is a terrific tool for photographers, and I was able to confirm that sunset would occur at 8:54pm and that my chosen night was that of the new moon, so that I would not have to worry about moonlight:
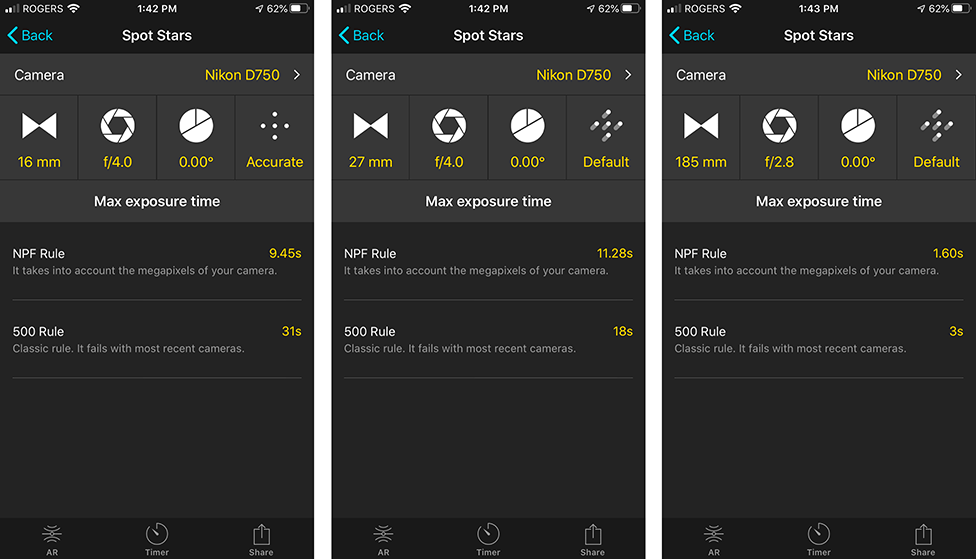
I also used Photo Pills to get an idea of what settings to use on my camera. I planned to shoot with my Nikon D750 using both a 16-35mm F4 wide angle lens (to try to capture some foreground), and a 70-200mm F2.8 telephoto lens (to try to get a closer look at the comet).
When shooting stars, you want to shoot wide open, and with a long exposure, as well as pushing your ISO out as much as possible (but without reaching the point where you are creating too much noise). Obviously, a tripod is a must.
However, when using long exposures, you have to be aware of the effects of the Earth’s rotation (amplified by using a longer focal length) or you end up getting star trails (or rice-shaped stars instead of circular points of light).
Advanced astrophotographers will use a tripod mounted motorized star tracker (https://astrobackyard.com/star-tracker-astrophotography/), as well as multiple exposures stacked with dedicated software such as Starry Sky Stacker (https://sites.google.com/site/starryskystacker/home).
I don’t have those tools (yet), so I was just trying to select exposure times that would be long enough to collect enough light, but short enough not to show star trails.
With the 16-35mm at 16mm on my D750 Photo Pills recommended an exposure of just less than 10 seconds (using the NPF rule) for “accurate” (circular point) stars (recommended for large prints). The NPF rule takes into account your sensor size and lens. You’ll note that the classic “500 Rule” would have suggested 31 seconds!
In actuality, I ended up shooting the wide shots at 27mm, for 10 seconds, at ISO 2500, which Photo Pills indicates would be good enough for “Default” quality (barely noticeable star trails). I also ended up shooting the “zoom” shots at 185mm for 2s.
With the prep-work done, I packed my gear and headed out to my location, planning to arrive about 45 minutes after sunset. As it turns out, when I got out there, I discovered the road shoulder was almost non-existent, and there was a fairly significant ditch on both sides of the road that was overgrown with tall grass. Lesson learned: visit your site in the day time first!
I ended up parking on the south side of the road, and could only pull the car about halfway off the road (leery of the tall grass and the ditch). I did not feel comfortable leaving the car there in the dark for somebody to run into so I left the hazards on (which contributed a bit to some orange foreground light pollution in my photos if I boosted the shadows in post-processing too much). Lesson learned: bring a partner to manage the car!
Fortunately, not a single car passed by during my hour out there, although there were several coyotes howling not too far in the distance to keep me company.
I was quickly able to find the Big Dipper (Ursa Major), but couldn’t initially see NEOWISE. One trick that I had read online was to use your peripheral vision to find it (it worked!) and once located, it was easy to find again.
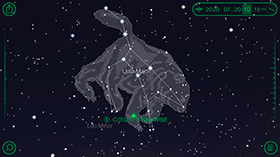
Another handy tool is the Star Walk app (https://apps.apple.com/ca/app/star-walk-explore-the-sky/id295430577) which has a night sky augmented reality mode that lets you hold your phone up to the sky and have it identify the location of celestial objects (and it included Comet NEOWISE in its database):
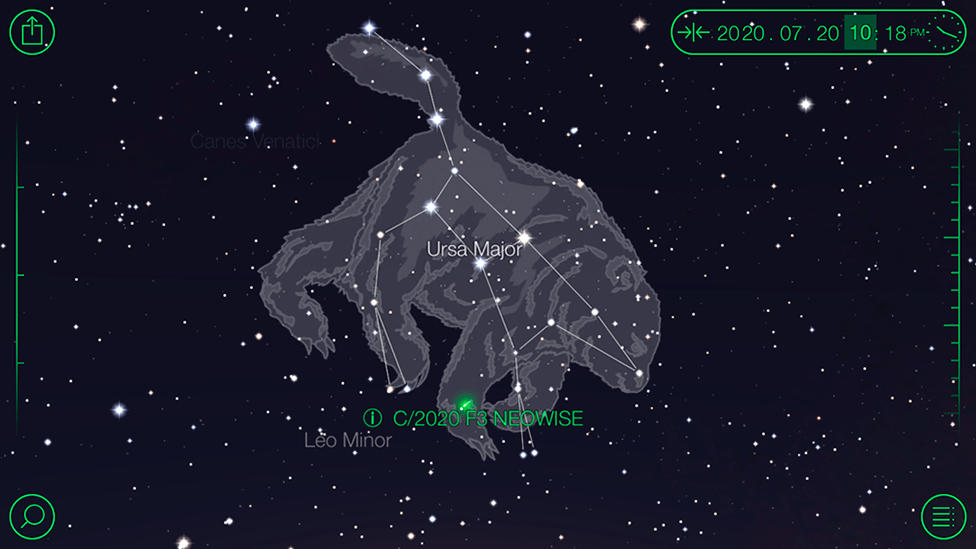
(This is not the AR view, but a screen capture I made later).
It was VERY dark out, but I did bring a flashlight to help with setting up the tripod, mounting the camera and changing lenses. Still, it was very hard to focus accurately at infinity in the dark, and it took a few attempts before I was satisfied on each lens. I used Live View at max magnification on one of the stars in Ursa Major to set the focus, and that seemed to work best.
So finally, we get to see the images! Honestly, they are a bit underwhelming but the purpose of this project was to learn and have some fun, and that purpose was definitely achieved!
Here’s the best wide shot (after processing), and a second version where I “connected the dots” to show Ursa Major (the Big Dipper):
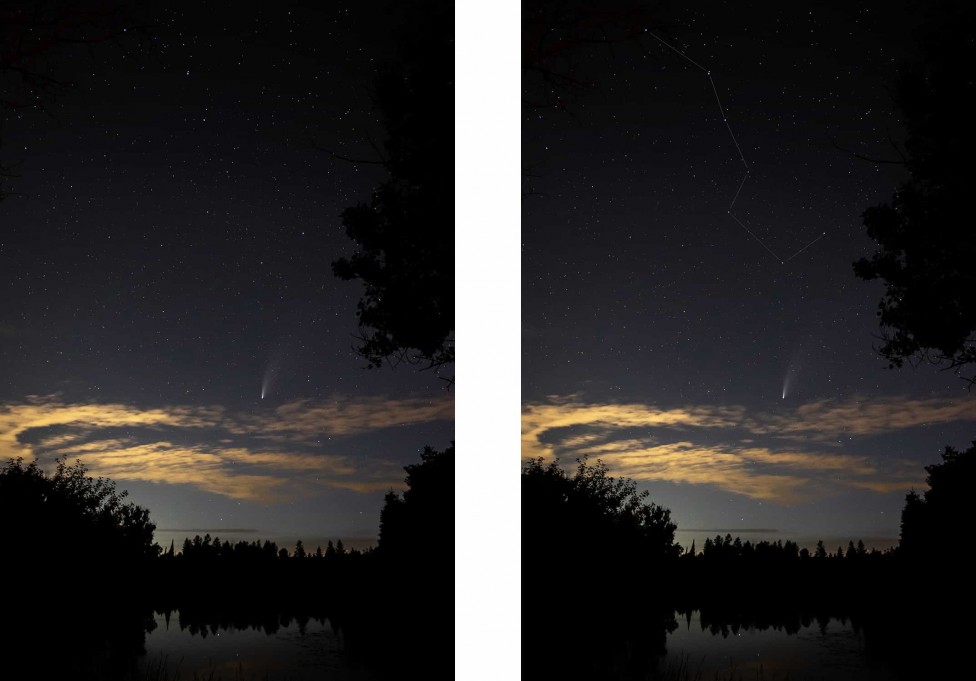
The glow to the left is the remnants of the sunset. In retrospect, I wish I had brought a more powerful flashlight and tried to do some light painting on the trees on the shore.
Most of the post-processing is lowering the highlights and boosting the whites. I also lowered the exposure and the shadows a bit too, as the sky was looking too bright (because we were only about 90 minutes past sunset). Going out later would have provided darker skies, but the comet would also have been much lower in the sky.
Lastly, here is the best “zoom” shot that gives a better look at the comet itself:
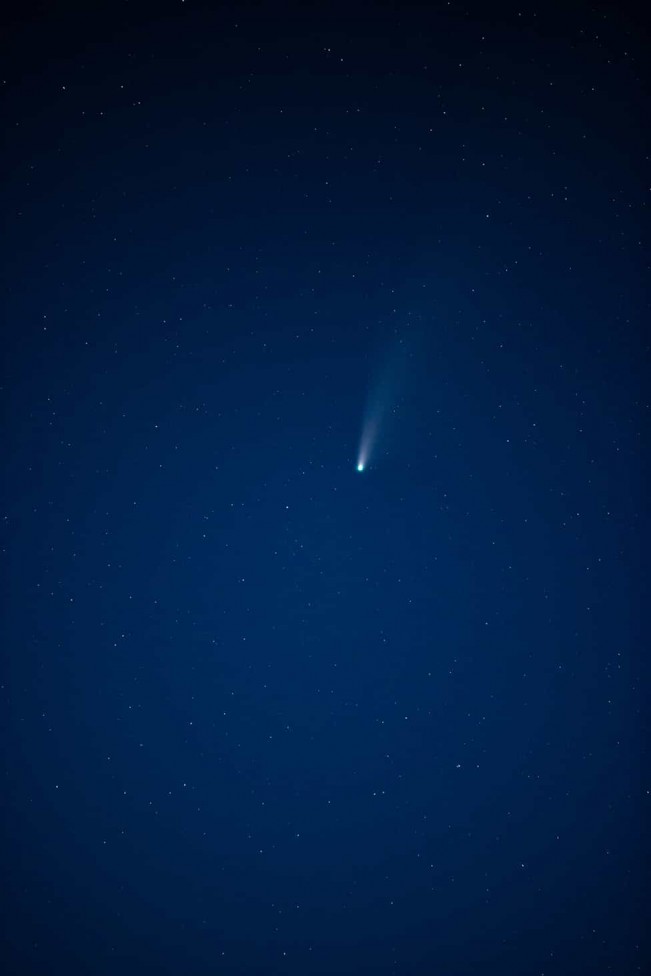
The comet actually has two tails. A faint narrow one on the left is bluer in color than the thicker white/grey tail on the right.
Overall, I am happy with how things went. I would definitely do some things differently next time. I learned a lot and I had fun, and that’s the best part.
Submission by Sean McKinnon.
Sean has been an Accredited Member of the PPOC since May of 2019 and has an accreditation in the Botanical Genre. He has a wide range of photography interests incuding Sports, Macro, Astrophotography, and Nature. His photography business has focused on Figure Skating / Equestrian / Banquet/Gala Events and Headshots in the Newmarket, Ontario area. You can find him on Instagram at:https://www.instagram.com/_seanmckinnon_/?hl=en